|
3. Open the Layers palette if it is not already onscreen.
Choose Window> Show Layers. Using the Layers palette makes it easier to create a
collage
4. If you have room on your hard disk, copy the files you need for the
project into a new folder in your hard drive. Then choose File>Open to open
all the files. As you open the files, you'll need to change the files mode from
Indexed color to RGB Color.
The files you need are located on The Adobe Premiere Bible
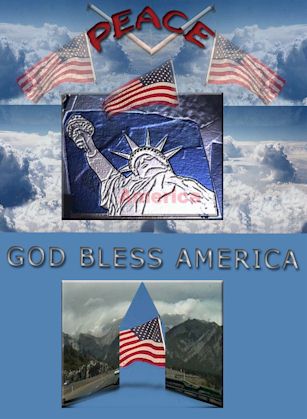
CD- ROM/DVD. Inside the Chapter 1 folder, there is a folder called America. In
the America folder there are 5 files used to create the Peace collage:
07america.gif (flag&cloud image), 08america.gif(clouds),
03america.gif(highway&flag image), 14america.gif (statue), 05america.gif (flag
image).
5. Choose Window> 05america.gif to activate the file with the flag and
blue sky. Next select the Eyedropper tool and click on an area in the blue sky.
Notice that the Foreground color in the Toolbox has changed to that color. Now
choose Window>Peace to activate the collage file. To fill the background of
the Peace file with this color choose Edit> Fill. In the Fill dialog box make
sure the Use option is set to Foreground color, the Blending mode set to Normal
and the Opacity set to 100%. Click OK to close the dialog box and set the
background to a blue sky color.
6. Activate 07america.gif file by clicking on it or choosing
Window>07america.gif. Next, select the Move tool from the Toolbox. With the
Move tool selected, click and drag on the Flag & Cloud image and drag it to
the left hand corner of the Peace file. (the flag&Cloud file was created by
superimposing a flag over a cloud image).
Duplicate the flag&cloud image by pressing the Option/Alt key while
dragging the image to the right. Move the image into the top, right corner. Then
flip it by choosing Edit> Transform> Flip Horizontal.
7. Activate the 08america.gif (cloud image). Then drag it into the Peace
file. Move it into position. Below the flag/cloud image. To duplicate the cloud
image, press and hold the Option/Alt key. If you want, also press the Shift key
to keep the duplicated image aligned with the original. If you want, you can
also lower the opacity of the cloud image so that it fades into the background.
To do so, change the Opacity option in the Layers palette. Note that the layer
that is selected in the Layers palette is the one that is affected.
8. Activate 03america.gif file (highway & flag image). Then use the Move
tool to drag and drop it into position in the Peace collage file. Use the Eraser
tool to Erase some of the blue from the image. Then double click on the
highway/flag icon in the Layers palette to open the Layer Style dialog box. In
the Layer Style dialog box click on the Bevel and Emboss option, then click OK
to close the dialog box and emboss & bevel the image.
9. Activate the 05america.gif (Flag image). Use the Eraser tool to erase the
blue background. When erasing you want to use a medium, soft edged brush. Also
lower the opacity. This will give you a soft edged effect.
Advanced users can use the Eraser tool with a layer mask. To test that
the blue has all been erased, you can hide all the other layers by clicking on
the eye icon in the Layers palette. To view the layer again, click on the eye
column to bring back the eye icon and view the layer. Click on the Move tool to
move the image into position.
10. Select the Type tool, to create the type.
Type the word Peace. Select the word, then set the font to Sand the type size
to 48 points and set the tracking to 55 point. We also added some kerning
(spacing between two letters). You can use the Character palette to change the
type options.
To warp the Peace text, click on the Warp icon. In the Warp dialog box set
the Style to Arc, Horizontal Blend to +50%, Horizontal and Vertical distance set
to 0%.
Use the layer Style dialog box to set a drop shadow and inner shadow
11. Use the Type tool, to Type the words, God Bless America. Select the
words, then set the then set the font to Sand the type size to 48 points and set
the tracking to 7 point. You can use the Character palette to change the type
options.
Use the layer Style dialog box to set a drop shadow and inner shadow
12. Save the file by choosing File>Save. If you want you can save your
file for the web by choosing File> Save for Web. Choose File> Save As to
make a copy of your file and save the copy with out any layers and in JPEG
format. In the Save As dialog box make sure to choose; without layers and set
the format to: JPEG
|
